BRUSH CALLIGRAPHY 101 PART 4: BASIC STROKES EXPLAINED
Now that you have understand the importance of guidelines in practicing any kind of calligraphy, we will discuss the basic brush lettering strokes. Before we start, I recommend for you to review the basic strokes of cursive writing. This will help you a lot. Let’s begin!
Generally, there are three group
of strokes for brush lettering calligraphy namely – straight lines, curve lines
and the loops.
STRAIGHT LINES
First, we will discuss about the STRAIGHT LINES. For straight lines,
there are two types – the downstroke and the upstroke.
Downstroke
It is the easiest stroke to
practice and should be the first. The reason you should practice the downstroke
first is because it is more natural to make and we are accustomed to it when
drawing lines (from top to bottom). The difference now is that as you do the
downstroke, you will apply medium to heavy pressure to produce thick lines
similar to example below. (Remember:
Thick and Heavy)
Upstroke
Next would be the upstroke. This
is the opposite of downstroke. You will start from the bottom to top but now
with light pressure to produce thin lines. Think of it as if you are checking
test papers =). (Remember: Thin and Light)
CURVE LINES
Next set of lines to practice is
what I call the CURVE LINES composed
of over turn, under turn and compound curve.
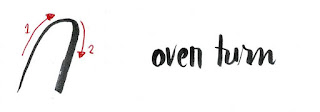
Overturn
Remember the time when you
practice the cursive letter “n”.
The overturn is similar to this, of course, except for the application of thick and thin strokes. When doing this stroke, imagine you are writing the half of the cursive letter “n”, starting with thin line as you go up until you reach the transition point then with thick line as you go down.
The overturn is similar to this, of course, except for the application of thick and thin strokes. When doing this stroke, imagine you are writing the half of the cursive letter “n”, starting with thin line as you go up until you reach the transition point then with thick line as you go down.
Underturn
For the underturn, the motion of
stroke is similar with the letter “u”.
Starting with the thick line as you down until you reach the transition point then you go up with thin line.
Starting with the thick line as you down until you reach the transition point then you go up with thin line.
Compound Curve
This is a combination of the
overturn and the underturn, similar to cursive letter "v".
If you have practice the overturn and underturn, the compound curve would be a breeze for you. To visualize this, imagine as if you are drawing a wave.
If you have practice the overturn and underturn, the compound curve would be a breeze for you. To visualize this, imagine as if you are drawing a wave.
LOOP
The last but not the least group
of strokes to practice are the loops. Basically, we have the ascending loop,
descending loop and the oval.
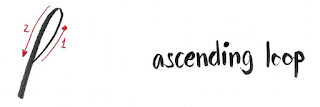
Ascending Loop
The ascending loop is similar to
the loop when you write the cursive letter “l” .
Just remember, Up and Thin then Down and Thick.
Just remember, Up and Thin then Down and Thick.
Descending Loop
On the other hand, the descending
loop is similar to the loop when you write the cursive letter “j”.
This time, the strokes will be Down and Thick then Up and Thin.
This time, the strokes will be Down and Thick then Up and Thin.
Oval
The stroke motion is similar to
letter “o”. like the descending loop, the strokes will be Down and Thick then
Up and Thin. Tip: Start at the 1 o’clock position to obtain a better oval
shape.
Conclusion
The basic strokes of brush
lettering is a combination of basics of cursive writing with the introduction
of Upstroke, Thin Lines and Downstroke, Thick Lines. It is advisable to
practice first the Straight Lines (upstroke and downstroke) for you have this
MUSCLE MEMORY.
Since there are different kinds of brush pen tips available in the
market, amount of pressure to apply will also vary. In the end, familiarization
of strokes and your pen is the key in mastering the basic strokes.
P.S. Remember this =)
Downstroke – Thick and Heavy
Upstroke – Thin and Light
Overturn Curve – Half the cursive
“n”
Underturn Curve - The cursive “u”
Compound Curve – The Combi Over
and Under Turn
Ascending loop – the cursive “l”
Descending Loop – the Cursive “j”
Like us on our Facebook Page Callighobby and follow us on Instagram @callighobby. Thanks and Enjoy Writing! Again, don't forget to LIKE and SHARE! Thanks!


Comments
Post a Comment